
How to Block Proxy Servers to Make Your Website More Secure

Proxy servers can be useful, they can be used to benefit you with security testing, however trolls attempting to attack your website often use proxy servers.
What Is a Proxy Server?
A proxy server allows the user to hide their internet identity; if you want to require all of your site visitors to access your WordPress website legitimate-ly, there is a simple two-step fix to block connections from proxy servers with PHP and .htaccess.
Some sites don’t mind receiving visitors from a proxy server, but there are many sites which require a user to access their pages from a legitimate source. Prohibiting access via proxy server ads an extra layer of security, but it isn’t necessary to keep your site secure. It’s like adding an extra layer of protection.
Blocking proxy access is an all or nothing solution, so before proceeding, make sure you are willing to prohibit all admittance from these servers.
Before starting this tutorial make sure you backup your website files and the database.
Step One
The first step in this two-step tutorial is simple. Add the below code snippet to your website’s root .htaccess file. Add it before any existing code.
# BLOCK PROXY VISITS
<IfModule mod_rewrite.c>
RewriteEngine on
RewriteCond %{HTTP:VIA} !^$ [OR]
RewriteCond %{HTTP:FORWARDED} !^$ [OR]
RewriteCond %{HTTP:USERAGENT_VIA} !^$ [OR]
RewriteCond %{HTTP:X_FORWARDED_FOR} !^$ [OR]
RewriteCond %{HTTP:PROXY_CONNECTION} !^$ [OR]
RewriteCond %{HTTP:XPROXY_CONNECTION} !^$ [OR]
RewriteCond %{HTTP:HTTP_PC_REMOTE_ADDR} !^$ [OR]
RewriteCond %{HTTP:HTTP_CLIENT_IP} !^$
RewriteRule .* - [F]
</IfModule>
Save and upload.
Return to your website to ensure everything is working correctly. Test a few of your links to see if these load and connect successfully. This first step blocks some proxy servers, but to set up a total block, move on to the second step.
Step Two
The second step, or layer, in this security solution, is the PHP portion. Go to your admin theme’s function.php file. This file is in your WordPress folder, under wp-content. If you do not have a function.php file under your theme, upload a blank one before moving forward.
Copy and paste the below code into your function.php file, at the very end.
// block proxy visits @ http://m0n.co/01
function shapeSpace_block_proxy_visits() {
if (@fsockopen($_SERVER['REMOTE_ADDR'], 80, $errstr, $errno, 1)) {
die('Proxy access not allowed'); } } add_action('after_setup_theme',
'shapeSpace_block_proxy_visits');
This second layer of protection blocks some of the most tricky proxy servers. Go back to your website and check its functionality. If is working correctly, it’s time to move on to the testing phase.
Note: Notice how this code has a message function to display when visitors access your site via a proxy.
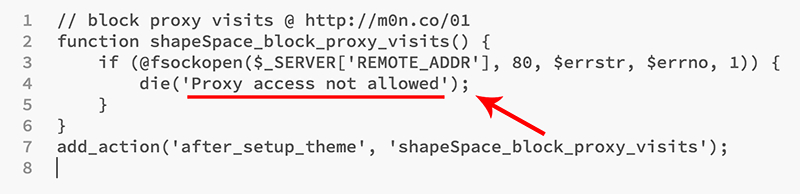
“Proxy access not allowed.” You can customize this to say whatever you like.
Save and upload this segment of code. If implemented correctly, there should be no issues navigating around your site.
Testing
Now the heavy lifting is done, test out your new security feature by at-tempting to reach your site via a few different proxy servers. I recommend trying multiple proxy servers to check the code thoroughly.
For demonstration purposes I will use Hidester.com
- 1. Go to https://hidester.com/proxy/
- 2. Past your website address in the Enter URL field and click Surf anony-mously.
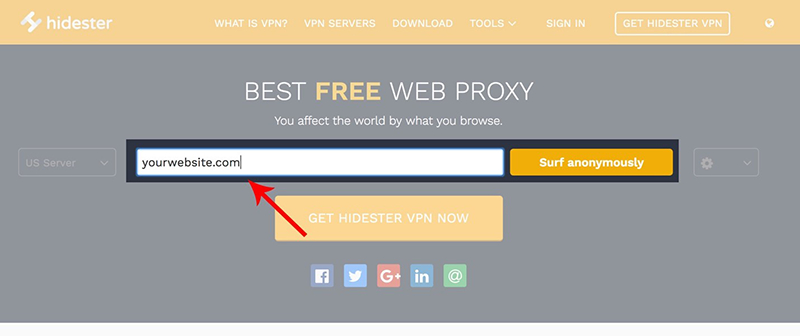
If everything done correctly, you should get an access not allowed message.
Your two layers of protection will block most attempts to reach your Word-Press website via a proxy server.
The coding provided cannot guarantee to block 100 percent of proxy servers, but your site is indeed more protected than before.
Posted by Emin Sinanyan
Related Posts


Today maintaining office security has become an important concern for businesses of all sizes.

Tech Support is also known as Technical Support Services.According to a common description, it is generally used to supply technology-related assistance to the users of pc, laptops, smartphones, televisions, or various software, electronic and mechanical products.
It’s essential to keep your website secure even if you don’t have any sensitive data that needs to be protected. Keep reading to find out more about the best practices for website security.

Identity theft and account takeovers are prevalent nowadays. Here are some measures you can apply to prevent payment fraud on your website.
Everyone is welcoming technological innovations with open arms. Entrepreneurs are reaping benefits of online marketing, while customers are happy to make online payments.


Comments
comments powered by Disqus