
Beginner’s Guide to Google Analytics for Bloggers

Analytics empowers you to make data-driven decisions to improve your blog and maximize its performance.
Google Analytics is arguably the most comprehensive analytics tool on the market. It informs you about your visitors, user activity on your website, dwell time metrics, and more. Yet, it’s underappreciated and mostly overlooked. Perhaps it’s because, at first glance, Google Analytics seems overwhelming. Given the information you can gain by using it, this tool is worth the effort.
Here, we’ll walk you through the basics of Google Analytics and help you get started. Once you get the hang of it, you’ll know exactly how to use this powerful tool to improve your content and maximize your blog’s performance.
What Can Google Analytics Do?
Google Analytics gives you an in-depth look at your blog’s performance. It shows you real-time data like who’s on your site, where they are from, and what days of the week they frequent your blog. It tells you which types of content get the most engagements. At the same time, it tracks the number of visits you get every hour of every day.
Here are a few examples of the data you can monitor through Google Analytics:
- Audience: This lets you identify where your visitors are from, what languages they speak, and what devices they use to access your content.
- Acquisition: This shows you how your visitors discovered your website and how well your digital marketing strategies work across various channels.
- Behavior: To find out how your visitors interact with your website, check out your behavior reports. This shows you how frequently each page was viewed, how long visitors stayed, etc.
Using Google Analytics, you might even find out if there’s a certain day of the week and time when your blog sees the most visitors. If so, you can schedule content at that particular time to reach and engage more people. By understanding who your visitors are, what content they prefer to consume, and how new visitors find your website, you’ll know what you need to do to expand your reach with your content.
Add Google Analytics to Your Blog
Setting up Google Analytics on your blog is fairly easy. There are three different ways to do this. Pick the most convenient one for you.
- Add the code in the template
- Put the code in the theme settings
- Use a Google Analytics plugin
There’s no need to add the Google Analytics code to every web page. All you have to do is put the code in each page template. Let’s say you use two different page templates throughout your website. You should paste the code twice, one for each template. If you have zero coding skills, it’s best if you avoid the second option as it requires you to manually edit the theme and insert the code. Don’t risk messing up your website.
Setting up Google Analytics is easier if you use a content management system (CMS) like WordPress as it provides a specific field for the code. Not to mention, you only have to add it there once. If you run a WordPress blog, there’s an even simpler way to incorporate Google Analytics—a plugin. The MonsterInsights plugin would be terrific for this purpose, especially if you’re new to Google Analytics and have no coding knowledge.
Collect Clean Data on Your Blog
Once you’ve set up Google Analytics on your website, you’ll need to wait a few hours before you can use it. That’s because it needs time to collect data on your website. Eventually, you’ll see live data and a quick overview report on your dashboard when logged in.
Before you get too excited to see your data, make sure you’ve filtered out visitors who you don’t want to see in the reports. You are your blog’s most frequent visitor. So you don’t affect your own data, you can filter yourself out. If you work with a team, include them as well.
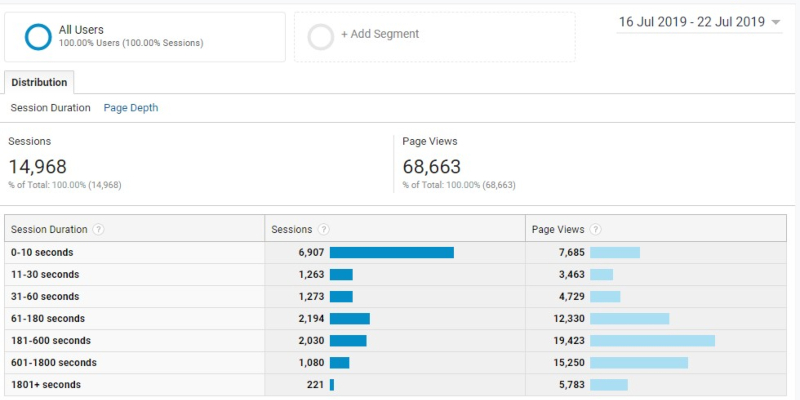
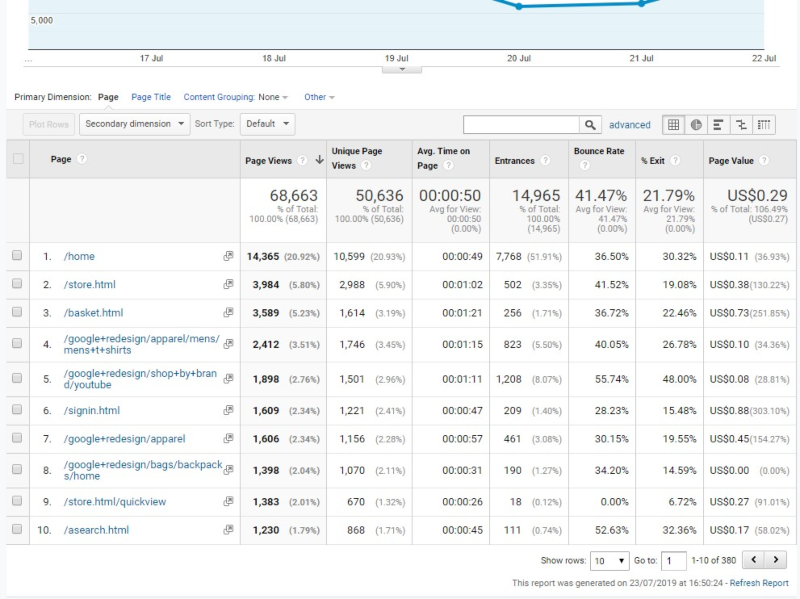
To view the performance of your blog posts, head to Behavior. Click on Site Content, then proceed to All Pages. From there, you’ll be able to see the number of page views each one generated, the average time spent on each page, the bounce rate, and so on. There’s an advanced option which is located at the top part of Google Analytics, right next to the search tab. You can use that feature to filter out non-blog posts.
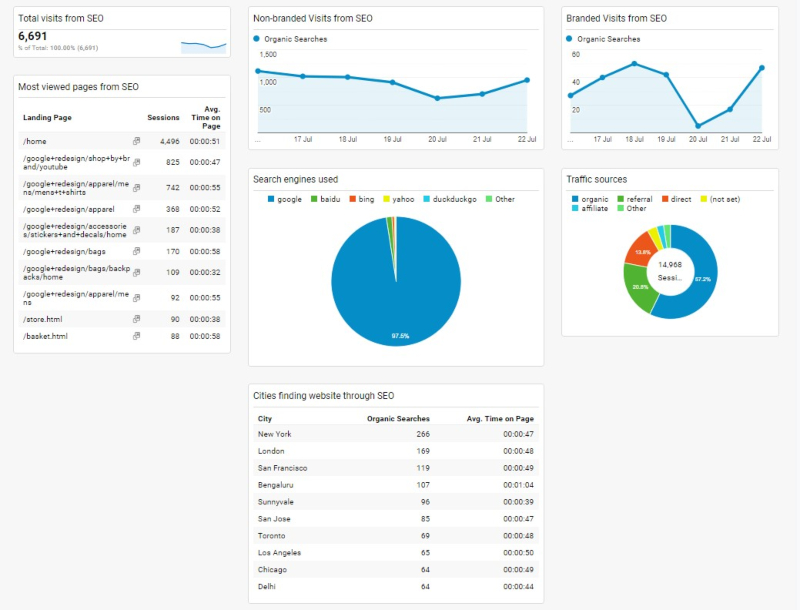
Set Up Site Search
Make sure to set up Site Search Tracking so you’ll know what your audience is looking up when they’re browsing your blog. This is what you need to do:
- Click the Admin tab.
- Proceed to the View column.
- Click on View Settings.
- Activate the Site Search Tracking.
- Add your website’s search query parameter.
Often, this is an -s- or a -q- Just to be sure, you can run a quick search on your website. Look up any topic on your search box, and you’ll find your query parameter in the URL itself. You’ll find it right before the query you searched.
Let’s say you searched for the word “writing” on your website’s search box. Your URL might look something like this: www.website.com/?s=writing.
The -s- before “writing” is your query parameter.
Once you’ve added the search query parameter, hit the save button, and Google Analytics will do the rest. You’ll be able to track what your visitors search for on your website from here on out.
Establish Your Goals
Like any endeavor, you have to establish your goals. Ask yourself: what is my website for? Take the time to answer that question.
Establishing specific actions as goals allows you to measure and determine the effectiveness of your website. Each time a visitor performs that action, Google Analytics counts that as a conversion. You can set up as much as 20 goals. To add goals, go to the View column under the Admin tab. Then, click on Goals. This takes you to a page with a red button with the words “+New Goal.” Click on that.
An excellent way to determine what you want to achieve is to classify your objectives into Macro and Micro goals. The former will focus on the metrics that make you money, while the latter prioritizes the most important aspects of blogging for you that don’t generate income.
Customize Your Dashboard
Make this notoriously complicated tool easier to navigate by customizing your dashboard. Google Analytics can track a wide array of metrics. To make everything less confusing for you, select the ones that matter to the goals you’ve set.
Your dashboard can contain up to 12 widgets, each of which can give you an overview of the metrics which matter to you. Some of the widgets which you can add include geographical maps, tables, and charts.
Here’s how you can add a widget to a dashboard:
- Make a new dashboard and select Blank Canvas, or use an existing one.
- Choose the widgets you want, and modify its dimensions, metrics, etc.
- Add a filter to exclude data.
- Click Save.
Google Analytics is truly an incredible tool for monitoring and measuring activity on your website. It might seem overwhelming at first, but you’ll get the hang of it. Just remember to take one step at a time. Little by little, you can expand your knowledge about this powerful tool, and you can maximize your website’s performance. We hope our little guide helps you set up everything you need and use Google Analytics to improve your website.
Posted by Callum Mundine

Related Posts

Speed defines Solana, but speed alone does not define useful testing.

Every question below came from real users, the kind that show up in forums and support threads over and over. The answers skip the fluff. If you have wondered any of these, read on.


Struggling to get your profile noticed no matter how often you post?

Imagine craving a beef burger really badly. So, you end up searching all the nearby restaurant options. What is the one thing that helps you decide where to order from?

The growth of digital advertising has unlocked countless opportunities but also introduced significant risks for modern marketing teams.


Comments
comments powered by Disqus