
How to Overclock a Mouse?

Yes, you've read that correctly! In this article I'll explain what exactly that is, and how you can do the same for your Rat.
27.06.2019. I've updated the article with the newest information . Please note that this guide is tested on windows 10 x64 1903ver. If you have an older windows version, you'll have to either find some other guide or update your windows.
Since, I had difficulties finding the correct procedure to increase polling rate of my mouse in windows 10 anywhere online, I've decided to write an article that will „cover“ everything.
DPI Explained
Dots per inch (DPI) is a measurement of how sensitive a mouse is. The higher a mouse’s DPI, the farther the cursor on your screen will move when you move the mouse. A mouse with a higher DPI setting detects and reacts to smaller movements.
Higher DPI isn't always better, as it seems to get too fast...
High DPI mice are more useful if you have a higher-resolution monitor. If you’re playing a game on a low-resolution 1366×768 laptop screen, you don’t necessarily need that high DPI. On the other hand, if you’re playing a game on a 3840×2160 4K monitor, a higher DPI lets you move your mouse cursor across the screen smoothly without having to drag your mouse across your entire desk.
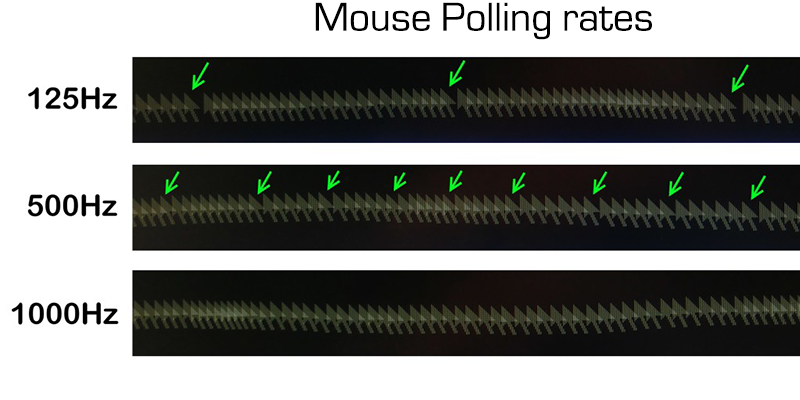
Polling Rate Explained
A mouse’s polling rate is how often it reports its position to a computer. Polling rate is measured in Hz. If a mouse has a 125 Hz polling rate, it reports its position to the computer 125 times every second—or every 8 milliseconds. A 500 Hz rate means that the mouse is reporting its position to the computer every 2 milliseconds, and for 1000hz every 1 ms.
Do I need to increase polling rate of my mouse?
Before you start overclocking, check to see whether your Mouse Software has an option integrated already to increase hz.
If you don't know if you have already software installed for mouse, I would suggest going on Mouse Manufacturer's website to see if there is any. If not, then follow these simple steps and note that this guide is intended for Windows 10 Systems (x32, x86, x64) ...
Please Beware! This procedure might burn your USB slot, and You, and only You are responsible for any action you perform with your mouse.
- Things needed for overclocking :
- Mouserate
- HIDUSBF signed driver
- USB Mouse rate Adjuster
You can download all files needed for this guide from HERE.
Mouserate : Mouse rate is a simple program that will measure Mouse Hz's. It will tell you how often the position of your mouse is sent to the other applications. This Parameter is quite important when you are using tools or games with high frame rates.
HIDUSBF : Hidusbf is just a driver file that will tell windows to „boost up“ your USB slot. Since this driver is now officially signed from Microsoft, there is no more need to do it in Windows Test Environment as you previously had to do.
USB Mouse Rate Adjuster : is a lightweight software that will help you manage your Mice's ( if you have more than one )
MOUSE OVERCLOCK PROCEDURE
- Step by Step :
- Download all files needed .
- Extract them to desktop
- Locate SweetLow certificate, double click it, click Install certificate – Current user .

- Locate HIDUSBF.INF , right click on it , click install .
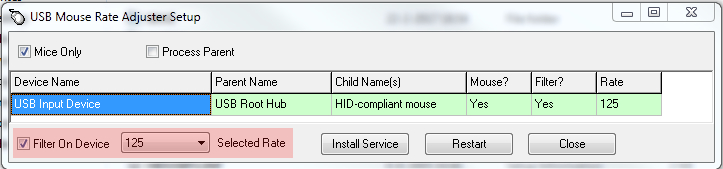
- Open UsbMouseRate.exe file as an Administrator, then select „Mouses Only“, filter on device, and choose your desired polling rate.
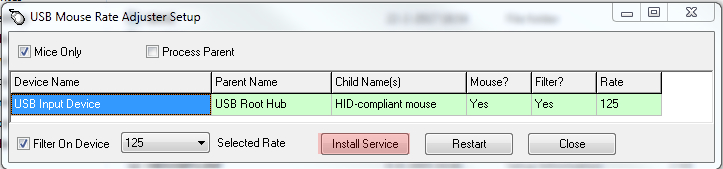
- Click Install Service
- And finally, click Restart, then Close.
- Restart your Windows, and afterwards check your results with mouserate.exe
If you are still having problems overclocking your mouse, try to disable driver signature verification. You can find simple instructions on how to do so bellow. To play around with windows 10 system files, you have to be an administrator because you have to run command prompt in an elevated mode as you are messing with the drivers...

- To put your Windows 10 in a test mode you have to :
- Open command prompt as an Administrator
- In Command Prompt type : bcdedit -set loadoptions DISABLE_INTEGRITY_CHECKS
- Inside of command prompt type : bcdedit -set TESTSIGNING on
- Restart your PC, and if everything is successfully done, you'll see Windows 10 Test mode - text on the right bottom of your screen.
Now you have to perform Mouse Overclock Procedure as described above step-by-step once again.
Conclusion :
Higher DPI and polling rates may be useful, but they’re not everything. There’s a good chance you’ll find yourself decreasing the DPI below the maximum value after buying a pricy gaming mouse. You definitely don’t need the mouse with the highest DPI and polling rate settings. These specifications aren’t a simple measurement of performance . Its more of a users preference.
Posted by Michael Johnson

Related Posts

Bingo isn’t the most popular casino game, but it continues to appeal to a diverse audience both in land-based locations and over the Internet.


Online casinos are a vital part of the fastest growing gambling industry in the world right now.

Sure, Linux is still the best for personalizing your desktop settings but when it comes to gaming, it’s a whole different story.

Online casino slots are one of the most playable online casino games around the world.

What’s the best CPU for gaming? What’s the best CPU for content creation?


Comments
comments powered by Disqus